![3_Transparent_Image_footer.png]](https://novineer.com/hs-fs/hubfs/3_Transparent_Image_footer.png?height=32&name=3_Transparent_Image_footer.png)
Use case: Scale a 3D model when no ruler is available.
Input: An unscaled 3D model plus one top-down photo showing the object and A4 or Letter paper.
Output: An scaled 3D model
How It Works
The software compares a feature in your reference photo with the same feature in the unscaled 3D model, then applies a scale factor. The paper provides the known real-world size.
This is the same workflow as Scale Based on Feature Size, but uses a paper sheet instead of a ruler.
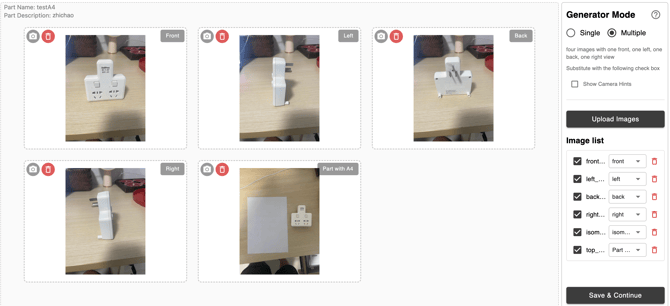
Figure 1. The four reconstruction views: front, left, back, and right, plus one extra reference photo showing the part with A4 or Letter paper.
Capture a Good Reference Photo
Photo quality directly affects scaling accuracy. Follow these four tips.
Tip 1: Shoot Top-Down
Use your phone's level crosshair or alignment guide to keep the camera directly above the object.
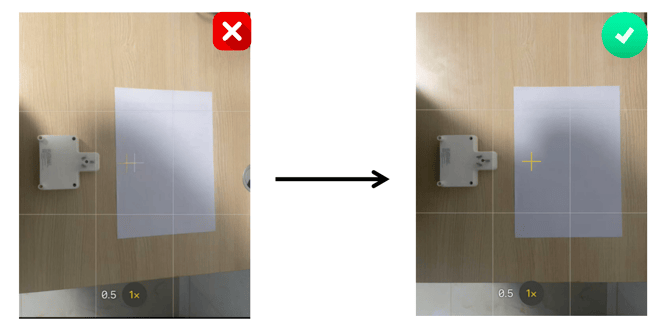
Figure 2. Align the on-screen markers for a true top-down view.
Tip 2: Align Paper and Object
Place the paper and the object facing roughly the same direction. This makes feature matching easier.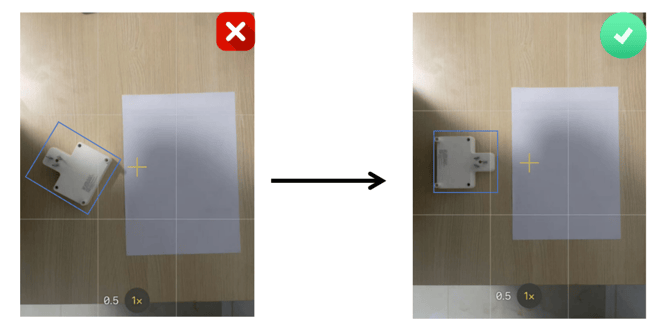
Figure 3. Keep the paper and object roughly aligned.
Tip 3: Use a Contrasting Background
Choose a background that clearly contrasts with both the paper and the object. Low contrast makes detection less reliable.
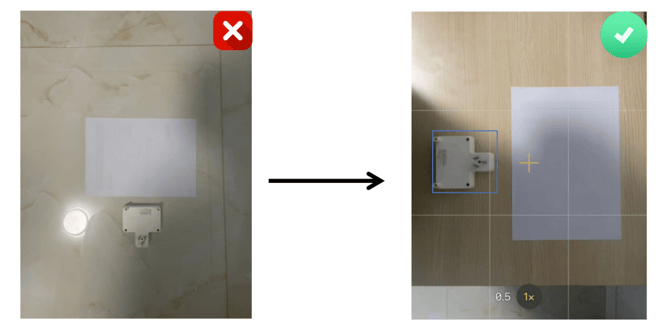
Figure 4. A contrasting background improves detection.
Tip 4: Use Flat, Clean Paper
Avoid wrinkled, folded, or creased sheets. They distort the reference size.
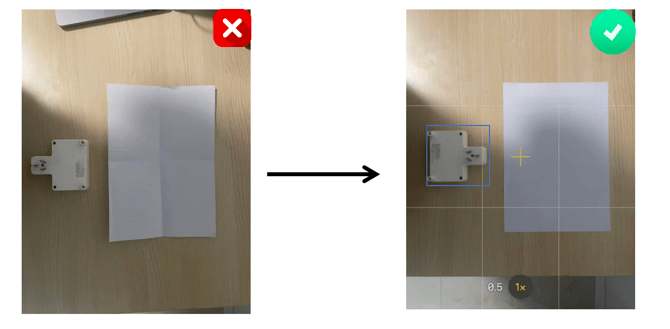
Figure 5. Flat paper gives accurate measurements.
Scaling Workflow
Step 1: Prepare the Model and Reference Image
Generate the 3D model from your reconstruction photos. Then take one extra photo showing the object together with the paper.
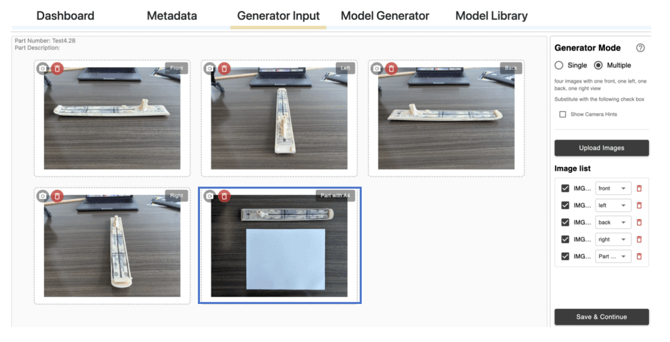
Figure 6. Example reference image with the part and A4 paper.
Step 2: Open the A4 Paper Scaling Toolbar
Click **Generate Model** to create the unscaled 3D model, then click **Scale Based on A4 Paper** to open the scaling toolbar.
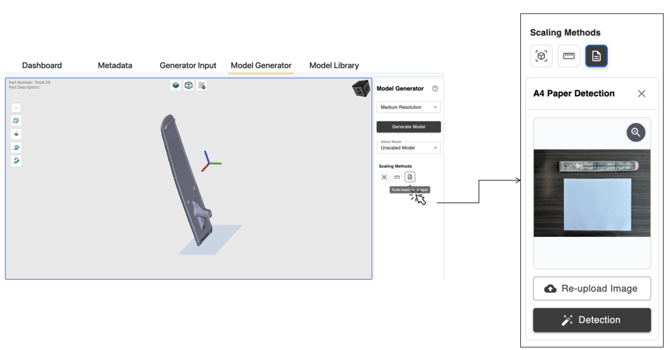
Figure 7. Open the A4 Paper Scaling toolbar.
Step 3: Run Detection
Click Detection to segment the object in the reference image. Use the magnifying-glass icon to zoom in if needed.
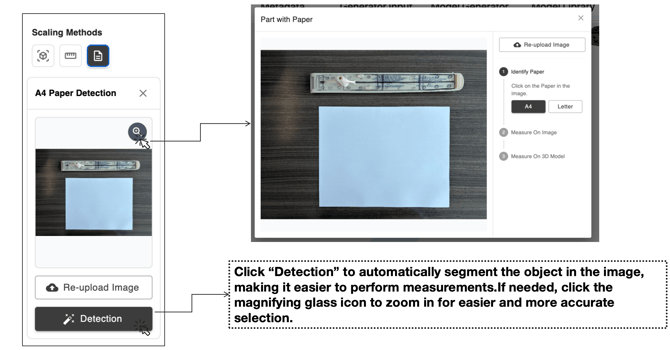
Figure 8. Zoom in for more precise point selection.
Step 4: Select the Paper Standard
- **A4:** 210 x 297 mm (8.27 x 11.69 in). Common in Europe, China, and most of the world.
- **Letter:** 216 x 279 mm (8.5 x 11 in). Common in the United States and Canada.
If unsure, check the packaging on your paper.
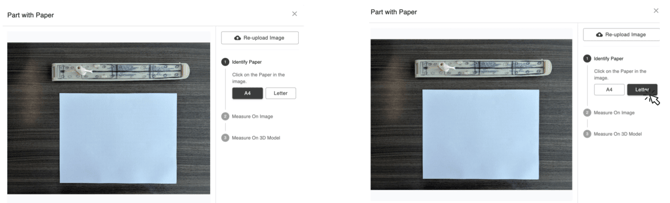
Figure 9. Choose A4 or Letter before calibrating.
Step 5: Select the Paper in the Image
Click anywhere on the paper. It will highlight in red, and the software calibrates the image scale automatically.
Optional: click Show Grid to overlay a measurement grid. The default spacing is 50 mm and can be adjusted in the Spacing field.
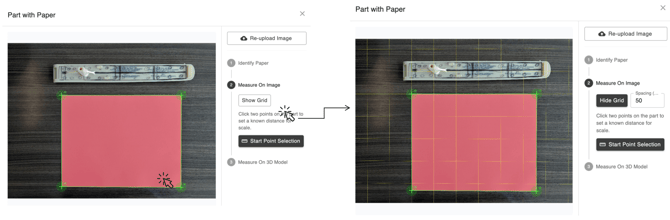
Figure 10. (a) Paper auto-selected for calibration. (b) Optional measurement grid.
Step 6: Measure a Feature in the Reference Image
Click **Start Point Selection**, then click two points on a clearly identifiable feature. The software shows the real-world distance. In the example below, the distance is 327.69 mm.
Step 7: Measure the Same Feature in the 3D Model
Find the same physical feature in the unscaled 3D model and measure between the matching two points.
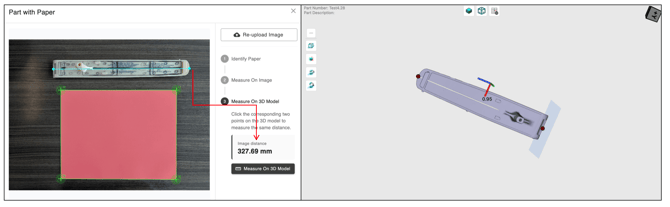
Figure 11. (a) Measurement in the reference image. (b) Same feature measured in the 3D model.
Accuracy tip: Pick a feature that is easy to recognize in both the image and the 3D model. Longer features reduce proportional error compared with very short measurements.
Step 8: Apply Scale and Verify
Click Apply Scale. Then open the Bounding Box tool in the left toolbar. Its dimensions should match the real part.
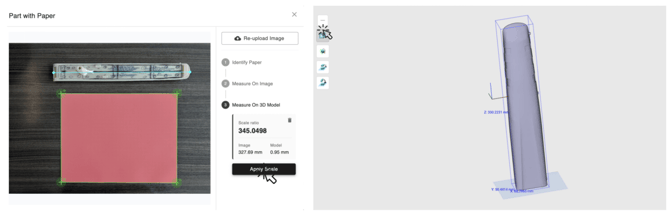
Figure 12. (a) Apply the scale factor. (b) Verify with the Bounding Box tool.
Quality Checklist
- The reference image shows the complete object and a complete sheet of paper.
- The camera angle is close to top-down, with minimal perspective distortion.
- The object orientation in the photo matches its orientation in the 3D model.
- The two measurement points represent the same physical feature in both views.
- After scaling, the Bounding Box dimensions match the expected real-world size.